在了解了 VS Code 的通信机制后,我们可以着手分析 VS Code Server 中各模块的实现以及设计思路了。
<!-- more -->
VSCode Server 模块设计
通过之前的介绍我们可以了解到,VS Code 的能力是前后端分离的,这使得 remote server 的改造实现变得简单。
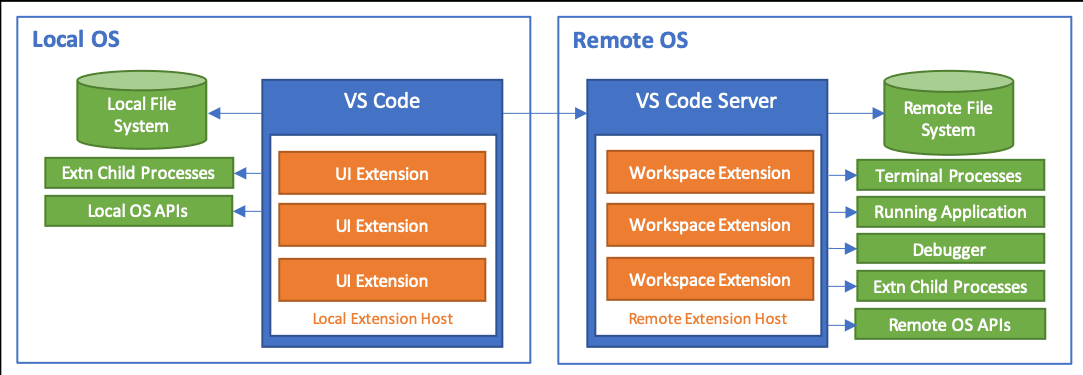
通过这一张架构图,我们可以直观的看到在 VS Code 中,前后端能力职责的划分。
可以看出,除了少数的一些像本地文件上传,语法高亮、主题设置等能力,一些重依赖多进程通信、OS支持,语言编译的能力都被设计在了 Server 端中,以保证 Client 端足够的轻量简洁,可以运行在 Web 这样的轻环境中。
在本篇中,我来带大家浅要分析 Server 端的几个重要模块的设计思路与实现。
Remote File System 设计
Remote File System 负责处理文件系统的读写操作,同时还需要处理文件系统的变化事件,以便于客户端能够实时更新文件系统的变化。在 VSCode 中,它封装了一层 Virtual file system 来实现对不同文件系统的兼容控制。
这一部分是 VSCode Server 的核心中最容易实现的部分。它本质上就是使依赖现代浏览器的 File_System_Access_API 来实现的(强制在 HTTPS 下使用)。
async function getTheFile() {
  // open file picker
  [fileHandle] = await window.showOpenFilePicker(pickerOpts);

  // get file contents
  const fileData = await fileHandle.getFile();
}
具体的代码声明位置见 FileSystemProvider。
这里使用 vscode-vfs 这个库来实现虚拟文件系统。这是一个 URI 方案,它注册了 File System Provider,并且该文件系统上的资源将由使用该模式的 URI 表示(例如vscode-vfs://vscode/package.json)。
因此,直接打开远程存储库也得以实现,例如 Github Codespaces 的打开就是这样实现的。
使用 vscode-vfs://github/microsoft/vscode, 通过访问 https://github.com/microsoft/vscode,就能够在不进行 git clone的情况下,直接打开项目文件夹了。
实例化后,全局都可以通过传入 RuntimeEnvironment,通过 runtime.fs 来访问与调用。
async stat(uri: string): Promise<FileStat> {
    if (fileFs && uri.startsWith('file:')) {
        return fileFs.stat(uri);
    }
    const res = await connection.sendRequest(FsStatRequest.type, uri.toString());
    return res;
}

readDirectory(uri: string): Promise<[string, FileType][]> {
    if (fileFs && uri.startsWith('file:')) {
        return fileFs.readDirectory(uri);
    }
    return connection.sendRequest(FsReadDirRequest.type, uri.toString());
}
当然,对于不支持这套 API 的浏览器来说,打开时会检测接口,弹出警告。
至于解决方式,之前说过,VSCode 的 server 端是同构的,server 自然也能提供本地文件系统支持,仍可以通过浏览器的上传 API 来实现。
Remote Terminal Process 设计
这里实际上是复用了VSCode 之前推出的 Remote-Server extension 能力,通过 SSH 隧道的方式,将终端的输入输出流转发到远程服务器上。(再一次说明了为什么强制要求在HTTPS下使用)
还记得我们之前提到过的,Channel 为通信的最小单元吗?VSCode Server 的 Remote Terminal 就是通过一个 RemoteTerminalChannel 来实现的。
通过监听与触发不同的事件(如onExecuteCommand, sendCommandResult),来实现对 Remote Terminal 的不同行为的信息同步。
    async call(ctx: RemoteAgentConnectionContext, command: string, args?: any): Promise<any> {
        switch (command) {
            case '$restartPtyHost': return this._ptyService.restartPtyHost?.apply(this._ptyService, args);

            case '$createProcess': {
                const uriTransformer = createURITransformer(ctx.remoteAuthority);
                return this._createProcess(uriTransformer, <ICreateTerminalProcessArguments>args);
            }
            case '$attachToProcess': return this._ptyService.attachToProcess.apply(this._ptyService, args);
            case '$detachFromProcess': return this._ptyService.detachFromProcess.apply(this._ptyService, args);

            case '$listProcesses': return this._ptyService.listProcesses.apply(this._ptyService, args);
            case '$orphanQuestionReply': return this._ptyService.orphanQuestionReply.apply(this._ptyService, args);
            case '$acceptPtyHostResolvedVariables': return this._ptyService.acceptPtyHostResolvedVariables?.apply(this._ptyService, args);

            case '$start': return this._ptyService.start.apply(this._ptyService, args);
            case '$input': return this._ptyService.input.apply(this._ptyService, args);
            case '$acknowledgeDataEvent': return this._ptyService.acknowledgeDataEvent.apply(this._ptyService, args);
            case '$shutdown': return this._ptyService.shutdown.apply(this._ptyService, args);
            case '$resize': return this._ptyService.resize.apply(this._ptyService, args);
            case '$getInitialCwd': return this._ptyService.getInitialCwd.apply(this._ptyService, args);
            case '$getCwd': return this._ptyService.getCwd.apply(this._ptyService, args);

            case '$processBinary': return this._ptyService.processBinary.apply(this._ptyService, args);

            case '$sendCommandResult': return this._sendCommandResult(args[0], args[1], args[2]);
            case '$installAutoReply': return this._ptyService.installAutoReply.apply(this._ptyService, args);
            case '$uninstallAllAutoReplies': return this._ptyService.uninstallAllAutoReplies.apply(this._ptyService, args);
            case '$getDefaultSystemShell': return this._getDefaultSystemShell.apply(this, args);
            case '$getProfiles': return this._getProfiles.apply(this, args);
            case '$getEnvironment': return this._getEnvironment();
            case '$getWslPath': return this._getWslPath(args[0]);
            case '$getTerminalLayoutInfo': return this._ptyService.getTerminalLayoutInfo(<IGetTerminalLayoutInfoArgs>args);
            case '$setTerminalLayoutInfo': return this._ptyService.setTerminalLayoutInfo(<ISetTerminalLayoutInfoArgs>args);
            case '$serializeTerminalState': return this._ptyService.serializeTerminalState.apply(this._ptyService, args);
            case '$reviveTerminalProcesses': return this._ptyService.reviveTerminalProcesses.apply(this._ptyService, args);
            case '$getRevivedPtyNewId': return this._ptyService.getRevivedPtyNewId.apply(this._ptyService, args);
            case '$setUnicodeVersion': return this._ptyService.setUnicodeVersion.apply(this._ptyService, args);
            case '$reduceConnectionGraceTime': return this._reduceConnectionGraceTime();
            case '$updateIcon': return this._ptyService.updateIcon.apply(this._ptyService, args);
            case '$updateTitle': return this._ptyService.updateTitle.apply(this._ptyService, args);
            case '$updateProperty': return this._ptyService.updateProperty.apply(this._ptyService, args);
            case '$refreshProperty': return this._ptyService.refreshProperty.apply(this._ptyService, args);
            case '$requestDetachInstance': return this._ptyService.requestDetachInstance(args[0], args[1]);
            case '$acceptDetachedInstance': return this._ptyService.acceptDetachInstanceReply(args[0], args[1]);
            case '$freePortKillProcess': return this._ptyService.freePortKillProcess?.apply(this._ptyService, args);
        }

        throw new Error(`IPC Command ${command} not found`);
    }

    listen(_: any, event: string, arg: any): Event<any> {
        switch (event) {
            case '$onPtyHostExitEvent': return this._ptyService.onPtyHostExit || Event.None;
            case '$onPtyHostStartEvent': return this._ptyService.onPtyHostStart || Event.None;
            case '$onPtyHostUnresponsiveEvent': return this._ptyService.onPtyHostUnresponsive || Event.None;
            case '$onPtyHostResponsiveEvent': return this._ptyService.onPtyHostResponsive || Event.None;
            case '$onPtyHostRequestResolveVariablesEvent': return this._ptyService.onPtyHostRequestResolveVariables || Event.None;
            case '$onProcessDataEvent': return this._ptyService.onProcessData;
            case '$onProcessReadyEvent': return this._ptyService.onProcessReady;
            case '$onProcessExitEvent': return this._ptyService.onProcessExit;
            case '$onProcessReplayEvent': return this._ptyService.onProcessReplay;
            case '$onProcessOrphanQuestion': return this._ptyService.onProcessOrphanQuestion;
            case '$onExecuteCommand': return this.onExecuteCommand;
            case '$onDidRequestDetach': return this._ptyService.onDidRequestDetach || Event.None;
            case '$onDidChangeProperty': return this._ptyService.onDidChangeProperty;
            default:
                break;
        }

        throw new Error('Not supported');
    }
Extension Processes 设计
存储位置
VSCode Server 会将通过 code-server --install-extension <extension id> 命令安装的 extensions 存储在 $XDG_DATA_HOME/code-server/extensions 下。
用户配置信息存储在本地的~/.vscode 下,使用官方的 Settings Sync 插件进行配置漫游。
插件分类
VSCode 将插件分为了 UI Extension 与 Workspace Extension 两种,通过 extensionKind 字段进行指定。
如果不涉及到 Node.js 调用的简单插件,是纯声明性质的代码的话(例如 Themes、key-binding,或者能直接利用客户端 API 能覆盖能力的插件等),则可以定义为 UI Extension,直接在客户端中执行,服务端只保存插件的配置信息,无需进行通信。
这也是为什么 vscode.dev 中(截至目前位置,该网页不包含 Server 能力),所有的主题、包括例如 TS、Python、Markdown、HTML 等语言的文件补全、语法高亮、括号着色都是可以正常使用的原因。因为在架构上,这些能力都是由客户端的内置插件(语言补全等相关特性是通过专门编写的 web worker thread 旁路执行)提供的,通过 VSCode API 直接进行调用。
但如果功能涉及到运行时的系统级调用,则需要被定义为Workspace Extension,它可以完全访问源码、文件系统、以及大部分 OS API。
Workspace Extension 需要安装在服务端,并需要在插件中显式声明。
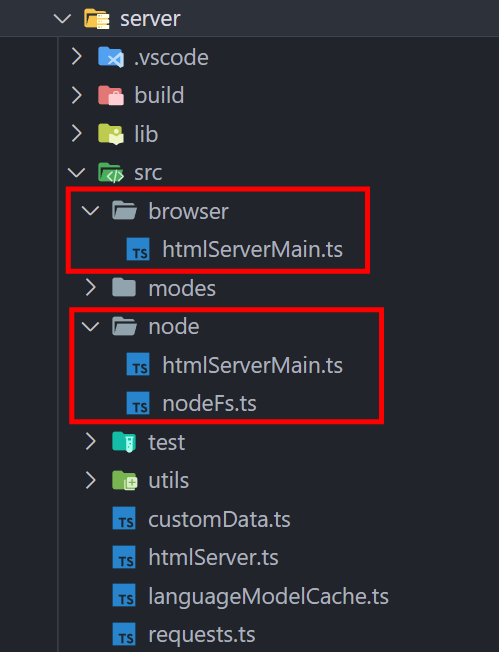
体现在编码规范上,我们需要为插件项目的 package.json 文件中添加 main 的 entrypoint,以执行服务端插件调用,而 UI Extension 的 entrypoint 使用 browser 表示。
{
    ...
    "main": "./dist/node/extension.js",
    "browser": "./dist/browser/extension.js",
    "capabilities": {
        "virtualWorkspaces": true
    }
    ...
}
逻辑上,插件需要根据 web 端与 server 端分开编写,并自行做好兼容。


**粗体** _斜体_ [链接](http://example.com) `代码` - 列表 > 引用。你还可以使用@来通知其他用户。