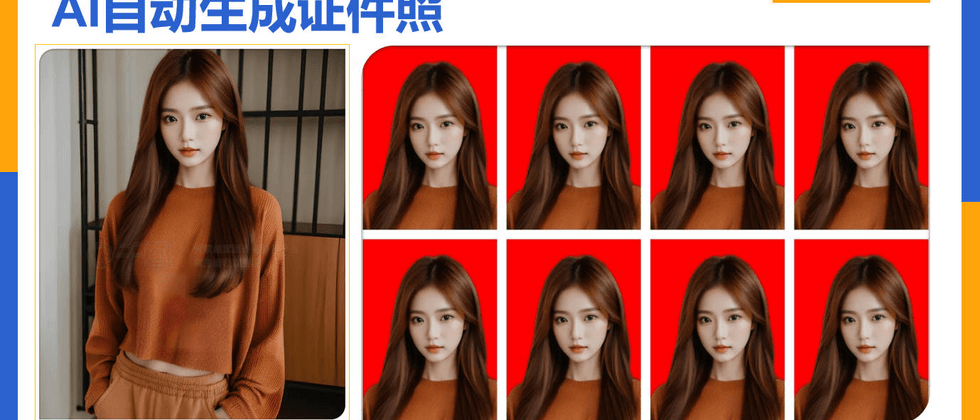
教程介绍
这个教程由来很好玩,有一次我需要一寸照片电子版,但是手头没有。因此通过小程序,上传了一张照片,就自动生成了证件照,效果还不错。于是我就很好奇这个东西怎么实现的,经过一番探索,终于找到了方案,然后编写代码验证,最终实现的效果还不错。
效果展示
先看效果这是根据模特的照片生成的证件照
这是根据孩子的照片生成的证件照
照片背景纯色,且与衣服颜色区别约明显,头发毛刺越少,效果会越好。
处理流程
涉及到的知识点主要是:
- rembg自动去除照片背景
- docker部署
- flask实现图片上传接口opencv
对于图片的裁剪、粘贴处理流程
流程如下:
Rembg的部署和使用
部署
Rembg的GitHub地址为:https://github.com/danielgatis/rembg部署这里我们使用docker部署,这样会省去很多环境相关的问题,部署起来比较方便。没有Linux服务器的小伙伴可以安装一个linux虚拟机,我就是使用的centos7虚拟机。
下面是镜像在docker hub上的地址:
需要注意,可能镜像不同的版本,容器需要映射的端口会不一样,具体可以点击镜像,看一下制作镜像的命令。例如点击057d666b62f6 ,进入看docker的镜像打包命令,可以看到端口对外暴露7000
docker部署具体指令参考文档。此处不再赘述。
接口使用
直接使用命令行请求如下:
# /data/rembg/test.jpg是图片路径 ,后面跟的是接口地址,-o是去掉背景后的图片输出路径
curl -s -F file=@/data/rembg/test.jpg "http://localhost:7000/api/remove"  -o /data/rembg/testout.png
也可使用swagge查看接口文档:接口详细使用文档:http://容器所在服务器ip:7000/api , 端口要改成映射的端口
使用postman调用接口,示例如下:
flask实现图片上传接口
@app.route('/upload', methods=['POST'])
def upload_file():
    try:
        # 省略校验文件和获取rgb参数代码
        ......

        # 按照RGBA拼接url的背景参数其中%2C是逗号
        bg_color_str = f"{red_color}%2C{green_color}%2C{blue_color}%2C255"

        # 生成文件名
        uuid_time_str = generate_file_name();
        png_file_name = uuid_time_str + '.png'
        jpg_file_name = uuid_time_str + '.jpg'
        if file:
            # 保存图片
            file.save(jpg_file_name)
            # 调用接口去除图片背景
            rembg_success = rembg_photo(jpg_file_name, png_file_name, bg_color_str)
            # 如果 rembg_success为False,退出
            if not rembg_success:
                return jsonify({"code": 1002, "msg": "处理图片失败"})
            # 将去除背景后的图片扩大20%
            expend_photo_background(png_file_name, png_file_name, (red_color, green_color, blue_color, 255))
            # 检测人脸并裁剪
            crop_success = face_detector_and_crop(png_file_name, jpg_file_name)
            if not crop_success:
                return jsonify({"code": 1002, "msg": "处理图片失败"})
            # 按照4列2排排版生成最终图片
            layout(jpg_file_name, jpg_file_name)
            return jsonify({"code": 0, "msg": "处理图片成功,会发送到邮箱"})
    except Exception as e:
return jsonify({"code": 1003, "msg": str(e)})- 首先我们先通过request实现图片上传,图片的参数名位file
- 其次为图片生成名称,保存到本地。其中.png图片是抠图后的图片;.jpg是抠图前的图片当然也是最后生成的图片,这里中间的处理生成的图片,我们也用同一个文件,不在用不同的文件,启不同的名字。
- 然后调用rembg去背景的接口然后将图片背景扩大20%,这样做的目的是为了裁剪计算时超出原图片的区域
- 然后检测人脸并裁剪
- 最后排版,生成证件照
- 调用Rembg接口去背景
def rembg_photo(photo_path, out_path, bgc=None):
    """
    处理原始图片,自动抠图,人像背景透明
    :param photo_path: 要抠图的图片
    :param out_path: 抠图后人像背景透明的图片
    :param bgc: 抠图后背景颜色
    :return true 抠图成功,false 抠图失败
    """
    # 调用接口处理原始图片
    # 替换为你的上传URL,bgc为要设置的背景颜色
    upload_url = 'http://192.168.192.11:7000/api/remove'
    if bgc is not None:
        upload_url = 'http://192.168.192.11:7000/api/remove?bgc=' + bgc
    form_data = {
        'model': 'u2net',  # 使用模型
        # 'model': 'isnet-general-use',  # 使用模型
        'a': 'false',
        'af': '240',
        'ab': '10',
        'ae': '10',
        'om': 'false',
        'ppm': 'false'
        # 添加更多表单参数,如有需要
    }
    response = upload_image_with_form(photo_path, form_data, upload_url)
    if response.status_code == 200:
        logging.info('图片上传成功-%s', photo_path)
        # 下载处理背景后的图片
        with open(out_path, 'wb') as f:
            f.write(response.content)
            logging.info("图片下载成功-%s", out_path)
            return True
    else:
        logging.info("图片上传失败-%s,status code-%s", photo_path, response.status_code)
        return False
扩大去掉背景后的图片
这样做的目的是为了根据人脸识别的区域,裁剪计算时超出原图片的区域
def expend_photo_background(photo_path, out_path, background_color):
    """
    将图片背景扩大40%
    :param photo_path: 背景透明的人像图片路径
    :param out_path: 扩大背景后的图片路径
    :param background_color: 要设置的纯色背景颜色,rgba模式,长度为4的整形tuple
    :return:新的图片路径
    """
    # 打开源图片即人像背景透明图片
    source_image = Image.open(photo_path)
    # 新建目标图片,新建一个纯色的图片,这里根据上传的图片大小,将目标图片扩大20%
    target_image = Image.new('RGBA',
                             (
                                 int(source_image.size[0] + source_image.size[0] * 0.2),
                                 int(source_image.size[1] + source_image.size[1] * 0.2)
                             ),
                             background_color)
    logging.info("imageSize:%s", target_image.size)
    """
    将源图片和成到目标图片上。即新建的纯色目标图片作为背景与源图片和成到一块
    第一个参数表示需要粘贴的图像;第二是坐标,是作为背景的目标图片的坐标;
    第三个参数是一个是mask,二维数组,用于指定透明区域,将底图显示出来。实现的效果是源图片人像周围透明的背景区域能够显示出目标图片
    而不是显示代表透明的灰白的那种方格子。可以去掉这个参数看效果不同
    """
    target_image.paste(source_image, (int(target_image.size[0] * 0.1), int(target_image.size[1] * 0.1)), source_image)
    # 保存图片
    target_image.save(out_path)
人脸检测并裁剪对应区域
def face_detector_and_crop(image_path, out_path):
    """
    通过图片识别是否有人脸并且根据人脸区域重新裁剪图片大小
    :param image_path: 要处理的图片路径
    :param out_path: 处理后图片的输出路径
    :return: True 处理成功 False 处理失败
    """
    image = cv2.imread(image_path)
    # 获取图片的宽高,重置图片尺寸
    (h, w) = image.shape[:2]
    # 设置目标图片的尺寸宽为700
    width = 700
    # 计算目标
    r = width / float(w)
    dim = (width, int(h * r))

    # 缩放图片大小
    image = cv2.resize(image, dim, interpolation=cv2.INTER_AREA)

    # 人脸检查
    gray = cv2.cvtColor(image, cv2.COLOR_BGR2GRAY)
    detector = dlib.get_frontal_face_detector()
    # 可能检测出多个人脸
    rects = detector(gray, 1)

    # 输出人脸区域的信息
    logging.info('检测到的人脸数目: {}'.format(len(rects)))
    if len(rects) > 1:
        logging.error('检测到不止一个人脸')
        return False

    for i, d in enumerate(rects):
        logging.info(
            "人脸所在区域: Left: %s Top: %s Right: {} Bottom: {}".format(i, d.left(), d.top(), d.right(),
                                                                         d.bottom()))

    # 尺寸重新确定,但是大部分都是 h/w = 1.4
    for i, d in enumerate(rects):
        # 检测出的人脸区域是等宽高的
        unit = d.right() - d.left()

        offset_top = int(unit * 1)
        offset_bottom = unit
        offset_width = int(unit * 0.6)

        logging.info("offsetTop:%s offsetWidth:%s", offset_top, offset_width)
        logging.info("%s:%s %s:%s", d.top() - offset_top, d.bottom() + offset_bottom, d.left() - offset_width,
                     d.right() + offset_width)

        # 裁剪图片
        image = image[d.top() - offset_top:d.bottom() + offset_bottom, d.left() - offset_width:d.right() + offset_width]
        # 把绘制区域后的图片另存为成新图片
        cv2.imwrite(out_path, image)

        return True
其中:detector = dlib.get_frontal_face_detector() 功能是获取一个人脸检测器rects = detector(gray, 1) 返回人脸检测的矩形框的4个点坐标
排版
def layout(image_path, out_path):
    '''
    将处理后的图片进行排版
    :param image_path:
    :param out_path:
    :return:
    '''

    temp_img = Image.open(image_path)
    # 设置排版头像图片之间的间隔
    offset = 20

    # 计算新的排版后图片的宽度和高度,排版后的图片为两行四列,间隔20像素
    new_base_width = temp_img.size[0] * 4 + (4 + 1) * offset
    new_base_height = temp_img.size[1] * 2 + (2 + 1) * offset
    base_img = Image.new('RGB', (new_base_width, new_base_height), (255, 255, 255))
    logging.info("排版后图片的尺寸:{}".format(base_img.size))

    # 按照2行4列的方式排版粘贴图片
    # 第一个参数表示需要粘贴的图像,中间的是坐标,最后是一个是mask图片,用于指定透明区域,将底图显示出来。
    for i in range(2):
        y_offset = (i + 1) * offset + i * temp_img.size[1]
        for j in range(4):
            x_offset = (j + 1) * offset + j * temp_img.size[0]
            base_img.paste(temp_img, (x_offset, y_offset, x_offset + temp_img.size[0], y_offset + temp_img.size[1]))
    # 保存图片
    base_img.save(out_path)
SpringBoot服务扩展
如果需要配合SpringBoot开发,加入身份认证、限流、参数校验、全局异常处理,以及通过Docker部署。可以参考另一套课程:《OCR文字识别实战教程-零基础,SpringBoot结合PaddleOCR》实现车牌识别、文本识别、身份证识别 地址:https://www.bilibili.com/video/BV1RK411b7DU/?vd_source=b43073...
文档和源码获取
关注B站 牛魔王de
微信扫码,加入星球。可以获取资料,包括OCR文本识别、AI自动生成证件照等等。也可以通过星球问问题,加我微信。


**粗体** _斜体_ [链接](http://example.com) `代码` - 列表 > 引用。你还可以使用@来通知其他用户。