图像去噪(Image Denoising)的过程就是将噪点从图像中去除的同时尽可能的保留原图像的细节和结构。这里讲的去噪跟前面笔记提过的去噪不一样,这里是指高级去噪技术,前面提过的高斯平滑也能去噪,但高斯平滑去噪的同时也把边缘模糊化了,另外使用形态学的方法去噪是指去除一些粗的椒盐噪声。对于一幅密布噪点的图像,如果使其变得清晰又保留边缘细节,这是高级去噪技术所要解决的问题。
全变差
全变差去噪(Total variation denoising)是一种常用的去噪模型。全变差(或叫总变差)大概是指图像梯度的范数(norm)的积分。
一幅图像的细节(噪声或是干扰的不必要的)过多,全变差的值越高,所以让全变差最小化,去掉噪声和没用细节的同时,保留边缘等主要细节,正是这种模型的处理思想。用这种去噪技术产生的图像有点接近卡通的感觉。
下面要介绍的Chambolle去噪算法就是基于全变差去噪模型实现的。
chambolle去噪
scipy.ndimage模块只是提供了基本的图像处理方法,并没有提供Chambolle去噪函数,所以就要借助另一个库——scikit-image。
scikit-image
scikit-image(简称skimage)库是从scipy.ndimage扩展下来的,提供了更丰富的图像处理函数,去噪函数除了Chambolle还有Bilateral算法,比如边缘检测还有以前简单提过的Canny算子滤波器。
它也是由 SciPy 社区所开发的,可以跟NumPy等完美配合。
安装:
sudo apt-get install python-skimage函数说明:
skimage.restoration.denoise_tv_chambolle(im, weight=50, eps=0.0002, n_iter_max=200, multichannel=False)
im: ndarray类型,2维或3维
weight:越大去噪越多,但图像也会越失真
multichannel:对彩色图像而言,true表示对每一通道去噪

返回去噪后的图像,ndarray类型。
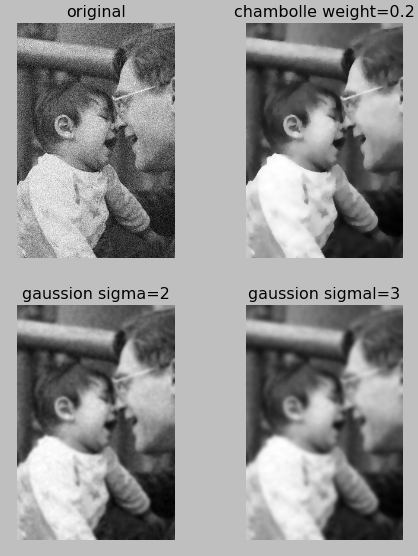
下面我用看具体的例子,将chambolle和高斯平滑进行对比:
from PIL import Image
import numpy as np
import matplotlib.pyplot as plt
from scipy.ndimage import filters
from skimage.filter import denoise_tv_chambolle  #for versoin: 0.9.3
#from skimage.restoration import denoise_tv_chambolle  #for new version

im = np.array(Image.open('noising.jpg').convert('L'))

index = 221
plt.subplot(index)
plt.gray()
plt.imshow(im)
plt.axis('off')
plt.title("original")

chdnim = denoise_tv_chambolle(im, weight=0.2)
plt.subplot(index+1)
plt.imshow(chdnim)
plt.axis('off')
plt.title("chambolle weight=0.2")

gs2dnim = filters.gaussian_filter(im, sigma=2)
plt.subplot(index+2)
plt.imshow(gs2dnim)
plt.axis('off')
plt.title("gaussion sigma=2")

gs3dnim = filters.gaussian_filter(im, sigma=3)

plt.subplot(index+3)
plt.imshow(gs3dnim)
plt.axis('off')
plt.title("gaussion sigmal=3")

plt.show()
效果对比如下:
明显感觉使用chambolle的效果要比高斯平滑好很多。
Bilateral滤波器
Bilateral滤波器跟之前介绍过的高斯模糊运算过程相似,而且它也使用了高斯核,但它的特点是在对图像进行平滑的同时能保留边缘。因为它在平滑滤波时同时考虑了像素间的几何距离和色彩距离。具体点说,如果要处理的像素与邻近像素的欧式距离比较大(即像素值相差比较大)时,那么这些邻近像素的权重就比较小,从而使得对滤波后的新像素值影响较小。另外,每个滤波后像素点的值,受与他色彩相近并且距离较近的像素点的影响较大,这两种权值分配方法起到了保护边缘的作用。
Bilateral去噪函数:
skimage.restoration.denoise_bilateral(image, win_size=5, sigma_range=None, sigma_spatial=1, bins=10000, mode='constant', cval=0)示例:
from PIL import Image
import numpy as np
import matplotlib.pyplot as plt
from scipy.ndimage import filters
from skimage.filter import denoise_bilateral  #for versoin: 0.9.3
#from skimage.restoration import denoise_bilateral  #for new version

im = np.array(Image.open('noising.jpg').convert('L'))

index = 221
plt.subplot(index)
plt.gray()
plt.imshow(im)
plt.axis('off')
plt.title("original")

plt.subplot(index+1)
plt.imshow(denoise_bilateral(im))
plt.axis('off')
plt.title("default")

plt.subplot(index+2)
plt.imshow(denoise_bilateral(im, sigma_range=0.2, sigma_spatial=10))
plt.axis('off')
plt.title("0.2/10")

plt.subplot(index+3)
plt.imshow(denoise_bilateral(im, sigma_range=0.8, sigma_spatial=10))
plt.axis('off')
plt.title("0.8/10")

plt.show()
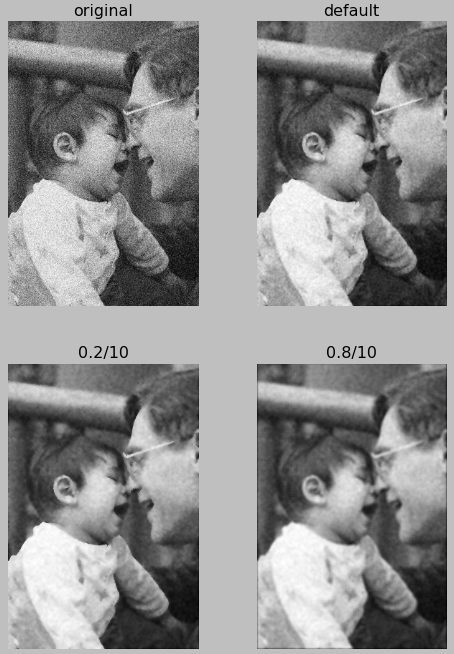
效果如图:
感觉比高斯平滑要好一些,但比Chambolle还是要逊色不少。
小结
因全变差的数学原理比较高深,所以暂时没去研究,只大概了解下并使用skimage库的接口进行了一番对比,结论就是使用chambolle去噪效果非常好。
至此,书中第一章的内容结束了。后面将开始下一章节的内容学习——图像描述。
你还可以查看我的其它笔记。


**粗体** _斜体_ [链接](http://example.com) `代码` - 列表 > 引用。你还可以使用@来通知其他用户。