vue-cli 3 英文文档
vue-cli 3 中文文档
webpack 4 plugins
webpack-chain
TLDR
vue-cli 3 与 2 版本有很大区别
- vue-cli 3 的 github 仓库由原有独立的 github 仓库迁移到了 vue 项目下
- vue-cli 3 的项目架构完全抛弃了 vue-cli 2 的原有架构,3 的设计更加抽象和简洁(此处后续可以详细介绍)
- vue-cli 3 是基于 webpack 4 打造,vue-cli 2 还是 webapck 3
- vue-cli 3 的设计原则是“0配置”
- vue-cli 3 提供了 vue ui 命令,提供了可视化配置,更加人性化
由于 vue-cli 3 也学习了 rollup 的零配置思路,所以项目初始化后,没有了以前熟悉的 build 目录,也就没有了 webpack.base.config.js、webpack.dev.config.js 、webpack.prod.config.js 等配置文件。
那么,我们该如何去配置自己的项目了?
其实这一切都是因为 vue-cli 3 的项目初始化,帮开发者已经解决了 80% ,甚至绝大部分情形下的 webpack 配置。
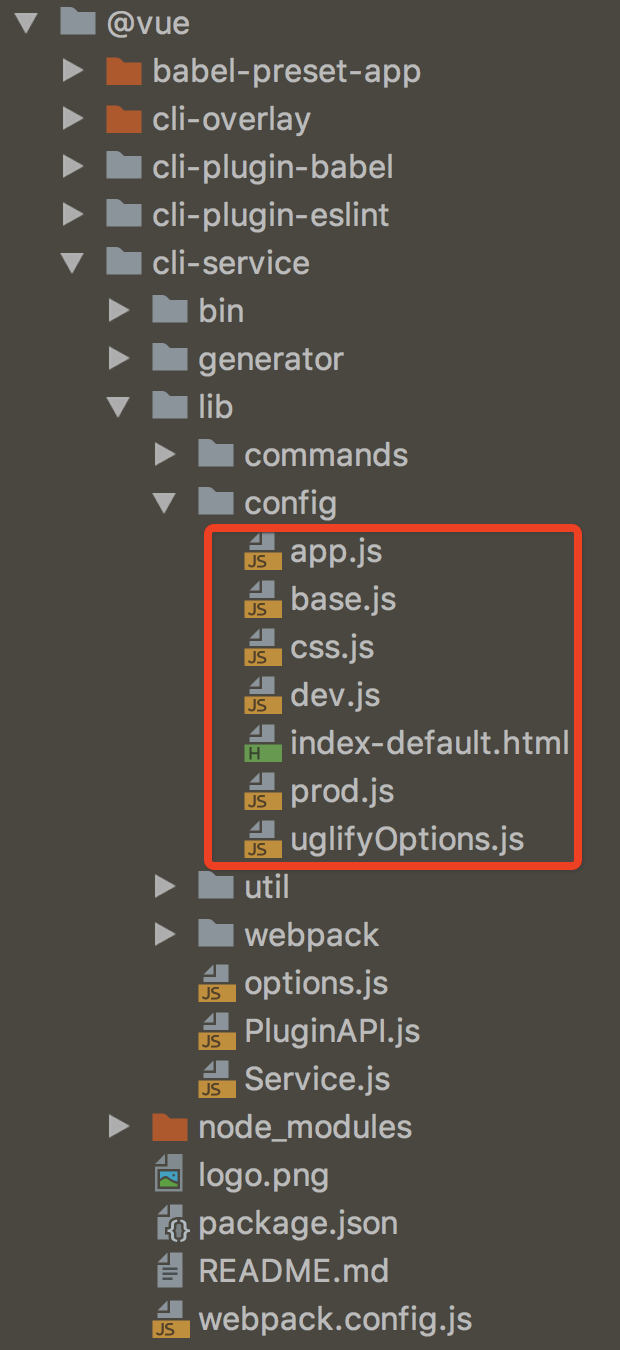
上述功能就是由 @vue/cli-service 依赖去处理,当你打开 node_modules 目录下 @vue 中的 cli-service 看一眼,是不是找到了熟悉的感觉?
说了这么多,开发者在实际开发过程中,肯定还有需要自己去修改配置的地方,那么,该怎么做了?
这点就需要在项目根目录下手动新建一个 vue.config.js,此处参考我提供的一个基础模板:
module.exports = {
  baseUrl: process.env.NODE_ENV === 'production'
    ? '//your_url'
    : '/',

  outputDir: 'dist',

  assetsDir: 'static',

  filenameHashing: true,

  // When building in multi-pages mode, the webpack config will contain different plugins
  // (there will be multiple instances of html-webpack-plugin and preload-webpack-plugin).
  // Make sure to run vue inspect if you are trying to modify the options for those plugins.
  pages: {
    index: {
      // entry for the pages
      entry: 'src/pages/index/index.js',
      // the source template
      template: 'src/pages/index/index.html',
      // output as dist/index.html
      filename: 'index.html',
      // when using title option,
      // template title tag needs to be <title><%= htmlWebpackPlugin.options.title %></title>
      title: '首页',
      // chunks to include on this pages, by default includes
      // extracted common chunks and vendor chunks.
      chunks: ['chunk-vendors', 'chunk-common', 'index']
    }
    // when using the entry-only string format,
    // template is inferred to be `public/subpage.html`
    // and falls back to `public/index.html` if not found.
    // Output filename is inferred to be `subpage.html`.
    // subpage: ''
  },

  // eslint-loader 是否在保存的时候检查
  lintOnSave: true,

  // 是否使用包含运行时编译器的Vue核心的构建
  runtimeCompiler: false,

  // 默认情况下 babel-loader 忽略其中的所有文件 node_modules
  transpileDependencies: [],

  // 生产环境 sourceMap
  productionSourceMap: false,

  // cors 相关 https://jakearchibald.com/2017/es-modules-in-browsers/#always-cors
  // corsUseCredentials: false,
  // webpack 配置,键值对象时会合并配置,为方法时会改写配置
  // https://cli.vuejs.org/guide/webpack.html#simple-configuration
  configureWebpack: (config) => {
  },

  // webpack 链接 API,用于生成和修改 webapck 配置
  // https://github.com/mozilla-neutrino/webpack-chain
  chainWebpack: (config) => {
    // 因为是多页面,所以取消 chunks,每个页面只对应一个单独的 JS / CSS
    config.optimization
      .splitChunks({
        cacheGroups: {}
      });

    // 'src/lib' 目录下为外部库文件,不参与 eslint 检测
    config.module
      .rule('eslint')
      .exclude
      .add('/Users/maybexia/Downloads/FE/community_built-in/src/lib')
      .end()
  },

  // 配置高于chainWebpack中关于 css loader 的配置
  css: {
    // 是否开启支持 foo.module.css 样式
    modules: false,

    // 是否使用 css 分离插件 ExtractTextPlugin,采用独立样式文件载入,不采用 <style> 方式内联至 html 文件中
    extract: true,

    // 是否构建样式地图,false 将提高构建速度
    sourceMap: false,

    // css预设器配置项
    loaderOptions: {
      css: {
        // options here will be passed to css-loader
      },

      postcss: {
        // options here will be passed to postcss-loader
      }
    }
  },

  // All options for webpack-dev-server are supported
  // https://webpack.js.org/configuration/dev-server/
  devServer: {
    open: true,

    host: '127.0.0.1',

    port: 3000,

    https: false,

    hotOnly: false,

    proxy: null,

    before: app => {
    }
  },
  // 构建时开启多进程处理 babel 编译
  parallel: require('os').cpus().length > 1,

  // https://github.com/vuejs/vue-cli/tree/dev/packages/%40vue/cli-plugin-pwa
  pwa: {},

  // 第三方插件配置
  pluginOptions: {}
};
所以现在所有的问题都集中在了--- 我到底要怎么样去修改这个配置文件?
一些简单的配置,比如多页面、接口代理,大家可以自己去看下官方 doc ,文章最上面有提供。
如果需要改动原本 webpack 的配置,该怎么做了?
因为 vue-cli 3 中的 cli-service 对 webpack 4 引入了 webpack-chain 插件,同时对配置进行了高度抽象化,所以开发者想随心所欲的修改配置,操作方式就比以前更加难。在我的亲身实践下,总结了几点,供大家参考:
首先,修改点主要位于 vue.config.js 中的
configureWebpack: (config) => {
// 简单/基础配置,比如引入一个新插件
},
chainWebpack: (config) => {
// 链式配置
}loaderOptions: {
css: {
// options here will be passed to css-loader
},
postcss: {
// options here will be passed to postcss-loader
}
}具体操作可以看文章最上面的链接,此处不再赘述。
核心一点就是: cmd 中敲 vue inspect > output.js , 这样我们会得到一份最终生效的 webpack 配置信息,省去了你自己去看 cli-service 源码。
然后,我举个栗子:
我的项目中,需要修改 eslint 的配置,让它不去检测我项目下的 src/lib 目录,因为这里是外部库文件(其实此处也可以在项目中直接新建一个 .eslintignore文件去处理,但我这里选择修改 webpack 文件)
第一步: vue inspect > output.js
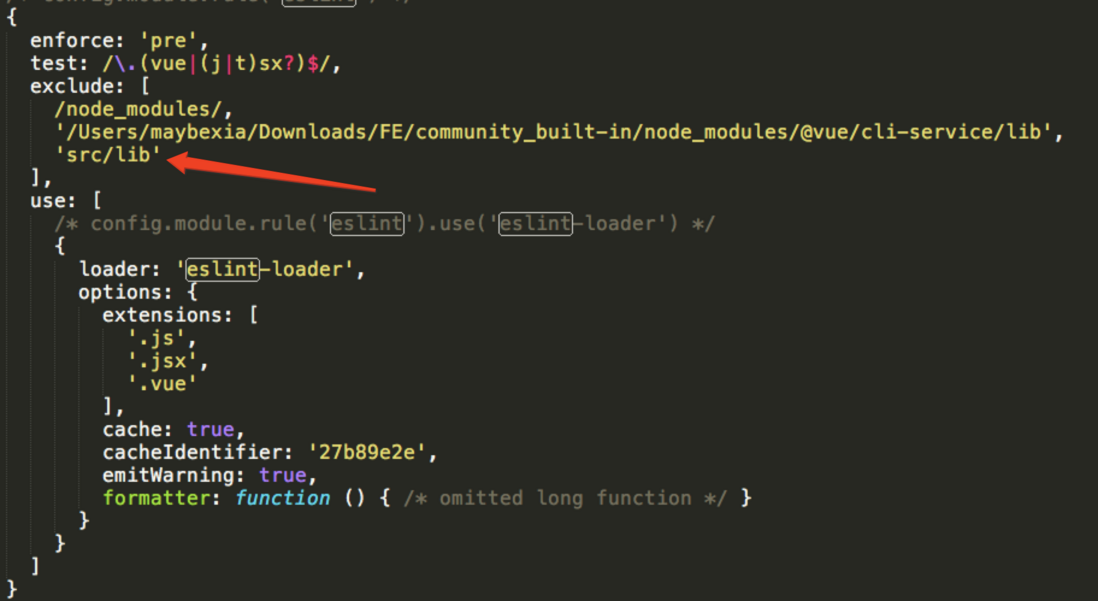
第二步: 在 output.js 中搜索 eslint 相关配置,结果如下:
第三步: 我确定了我要修的是 exclude 配置项
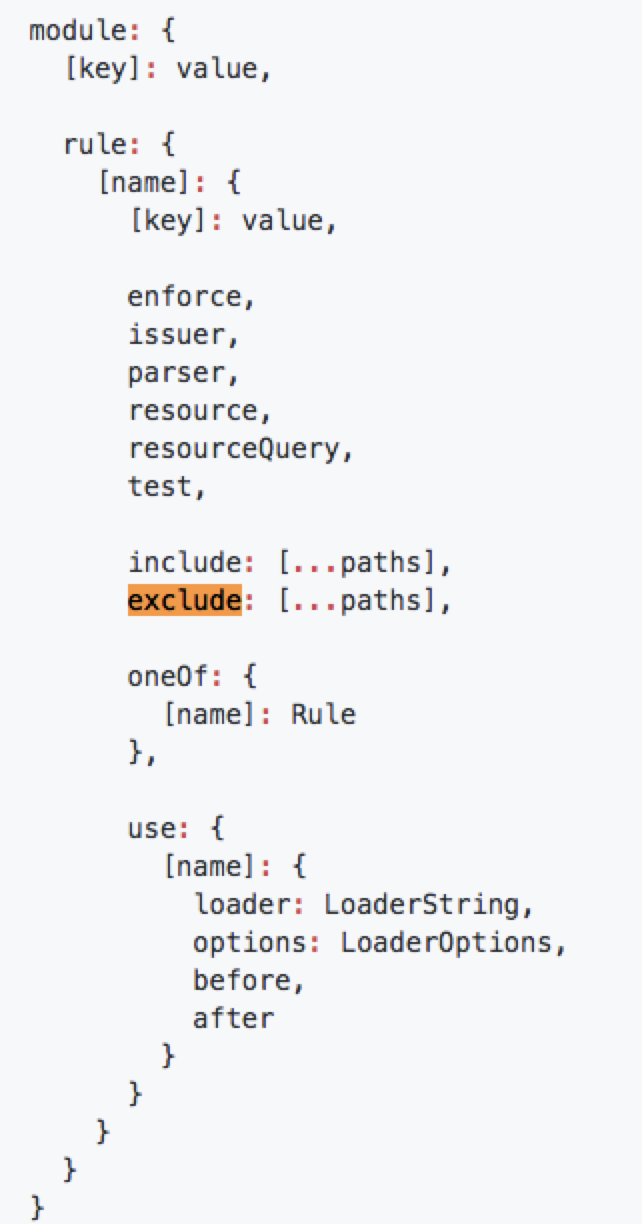
第四步: 去 mozilla-neutrino/webpack-chain 全局搜 exclude,结果如下:
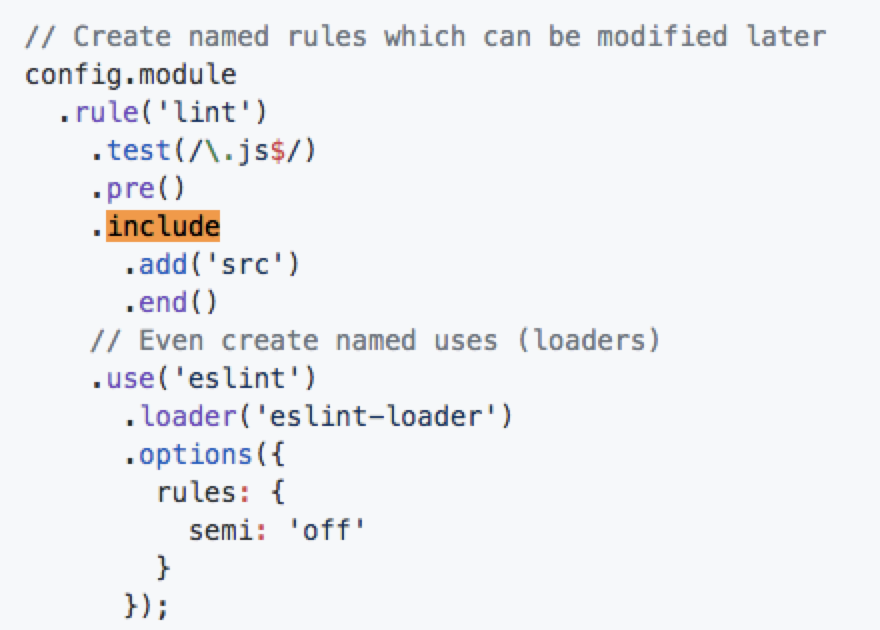
第五步: 因为 exclude 只出现了一次,微微一笑很倾城。但是我看到了 include,接着搜 include,结果如下:
第六步: 参考 include 的写法,以此类推:
最后,我们在 vue inspect > output.js 看一下,
done
总结一下,在多用几次 webpack-chain 以后,相信我,你会发现很多规律,vue-cli 3 也就很简单啦。


**粗体** _斜体_ [链接](http://example.com) `代码` - 列表 > 引用。你还可以使用@来通知其他用户。