背景
echarts官网的漏斗图和excel里漏斗图不太一样,记录自己尝试配置漏斗图的过程(主要是两侧label的实现)。
尝试一
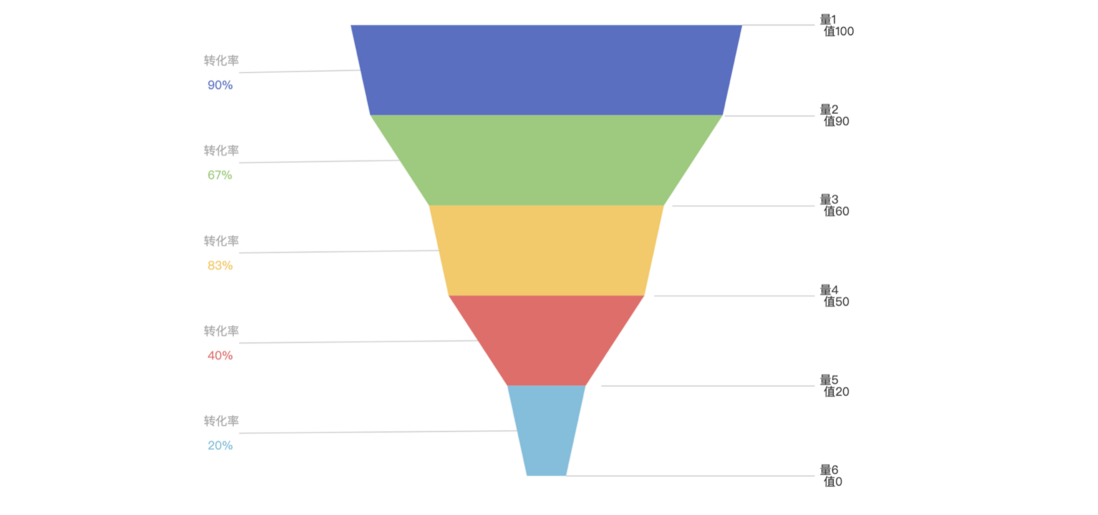
考虑只用一个漏斗图示例,默认是label的position为left,右侧label基于markLine实现
const chartFactWidth = 400; // 漏斗图的宽度
const chartMarginLeft = 200; // 漏斗图距离左侧距离
const chartCenterX = chartFactWidth / 2 + chartMarginLeft;
const minSize = 40;
const maxSize = chartFactWidth;
const percentSize = (maxSize - minSize) / 100.0;
const chartFactValueWidth = maxSize - minSize;

option = {
  title: {
    text: 'Funnel'
  },
  tooltip: {
    trigger: 'item',
    formatter: '{a} <br/>{b} : {c}%'
  },
  toolbox: {
    feature: {
      dataView: { readOnly: false },
      restore: {},
      saveAsImage: {}
    }
  },
  series: [
    {
      name: 'Funnel',
      type: 'funnel',
      left: chartMarginLeft,
      top: '10%',
      bottom: '10%',
      width: chartFactWidth,
      min: 10,
      max: 100,
      minSize: minSize,
      maxSize: maxSize,
      sort: 'descending',
      gap: 0,
      label: {
        show: true,
        position: 'left',
        formatter: function (params) {
          return (
            '{a|转化率}' + '\n ' + '{b|' + params.data.percent * 100 + '%}'
          );
        },
        rich: {
          a: {
            color: 'darkgray',
            lineHeight: 30
          },
          b: {
            height: 20
          }
        }
      },
      labelLayout(params) {
        console.log(params.rect.x + params.rect.width, params.rect.width);
        return {
          x: 50, //params.rect.x ,//50,
          y: params.rect.y + params.rect.height / 2,
          verticalAlign: 'middle',
          align: 'left'
        };
      },
      labelLine: {
        lineStyle: {
          width: 1,
          type: 'solid',
          color: '#ccc'
        }
      },
      itemStyle: {
        borderWidth: 0
      },
      emphasis: {
        label: {
          fontSize: 20
        }
      },
      data: [
        {
          value: 100,
          name: '量1',
          percent: Math.round((90 / 100) * 100, 2) / 100
        },
        {
          value: 90,
          name: '量2',
          percent: Math.round((60 / 90) * 100, 2) / 100
        },
        {
          value: 60,
          name: '量3',
          percent: Math.round((50 / 60) * 100, 2) / 100
        },
        {
          value: 50,
          name: '量4',
          percent: Math.round((20 / 50) * 100, 2) / 100
        },
        {
          value: 20,
          name: '量5',
          percent: Math.round((10 / 50) * 100, 2) / 100
        }
      ],
      markLine: {
        lineStyle: {
          width: 1,
          type: 'solid',
          color: '#ccc'
        },
        symbol: [],
        data: [
          [
            {
              name: '量1\n 值100',
              x: chartCenterX + minSize / 2 + (maxSize - minSize) / 2,
              y: '10%'
            },
            {
              x: '90%',
              y: '10%'
            }
          ],
          [
            {
              name: '量2\n 值90',
              x: chartCenterX + minSize / 2 + ((maxSize - minSize) / 2) * 0.9,
              y: '26%'
            },
            {
              x: '90%',
              y: '26%'
            }
          ],
          [
            {
              name: '量3\n 值60',
              x:
                chartCenterX +
                minSize / 2 +
                ((maxSize - minSize) / 2) * 0.9 * 0.67,
              y: '42%'
            },
            {
              x: '90%',
              y: '42%'
            }
          ],
          [
            {
              name: '量4\n 值50',
              x:
                chartCenterX +
                minSize / 2 +
                ((maxSize - minSize) / 2) * 0.9 * 0.67 * 0.83,
              y: '58%'
            },
            {
              x: '90%',
              y: '58%'
            }
          ],
          [
            {
              name: '量5\n 值20',
              x:
                chartCenterX +
                minSize / 2 +
                ((maxSize - minSize) / 2) * 0.9 * 0.67 * 0.83 * 0.4,
              y: '74%'
            },
            {
              x: '90%',
              y: '74%'
            }
          ],
          [
            {
              name: '量6\n 值0',
              x: chartCenterX + minSize / 2,
              y: '90%'
            },
            {
              x: '90%',
              y: '90%'
            }
          ]
        ]
      }
    }
  ]
};
问题
- Q1:markLine的起始点要自己计算,目前上述示例起始点计算不准确的;(这个回头空了再看了,各位同学亲们如果感兴趣可以看下)
- Q2:(思路)如果所需的漏斗图没有gap(图形间距),且右侧的线可以和本身图形颜色一样,那可以直接把中心点作为起始点即可,这个方案也可以用(相对方案四,少绘制一个漏斗图)。
尝试二
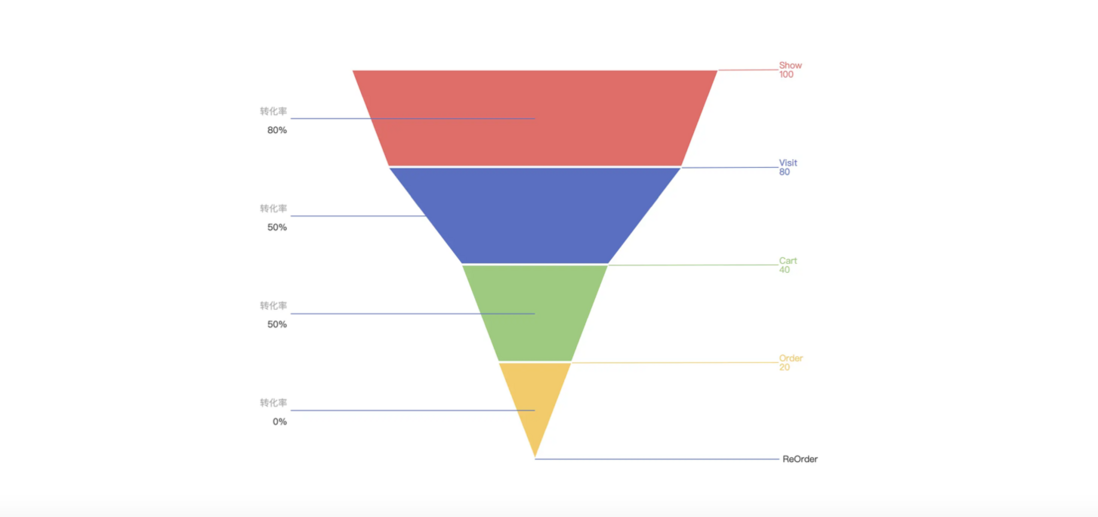
基于上述尝试一,由于每个右上角的点要自行计算,所以左右线实现方式调换。考虑只用一个漏斗图示例,默认(右侧)是label的position为rightTop,左侧label基于markLine实现,然后还要自行补充一条右侧markLine。
const topPercent = 5;
const heightPercent = 90;
const data = [
  { value: 80, name: 'Visit' },
  { value: 40, name: 'Cart' },
  { value: 20, name: 'Order' },
  { value: 100, name: 'Show' }
];
const itemCount = data.length;
const itemHeightPercent = heightPercent / itemCount;

option = {
  tooltip: {
    trigger: 'item',
    formatter: '{a} <br/>{b} : {c}%'
  },
  series: [
    {
      name: 'Funnel',
      type: 'funnel',
      left: '20%',
      top: topPercent + '%',
      bottom: 100 - topPercent - heightPercent + '%',
      width: '60%',
      min: 0,
      max: 100,
      minSize: '0%',
      maxSize: '100%',
      sort: 'descending',
      gap: 2,
      zLevel: 2,
      label: {
        show: true,
        position: 'rightTop',
        formatter: '{b}\n{c}'
      },
      labelLayout: function (params) {
        return {
          x: '90%',
          y: params.rect.y
        };
      },
      labelLine: {
        length: 10,
        lineStyle: {
          width: 1,
          type: 'solid'
        }
      },
      markLine: {
        symbol: 'none',
        lineStyle: {
          type: 'solid'
        },
        label: {
          formatter: function (params) {
            return params.name;
          },
          rich: {
            a: {
              color: 'darkgray',
              lineHeight: 30
            },
            b: {
              height: 20
            }
          }
        },
        data: [
          [
            {
              x: '50%',
              y: topPercent + itemHeightPercent * 0.5 + '%',
              name: '{a|转化率}\n{b|' + (80 * 100.0) / 100 + '%}'
            },
            {
              x: '10%',
              y: topPercent + itemHeightPercent * 0.5 + '%',
              name: '{a|转化率}\n{b|' + (80 * 100.0) / 100 + '%}'
            }
          ],
          [
            {
              x: '50%',
              y: topPercent + itemHeightPercent * (1 + 0.5) + '%',
              name: '{a|转化率}\n{b|' + (40 * 100.0) / 80 + '%}'
            },
            {
              x: '10%',
              y: topPercent + itemHeightPercent * (1 + 0.5) + '%'
            }
          ],
          [
            {
              x: '50%',
              y: topPercent + itemHeightPercent * (2 + 0.5) + '%',
              name: '{a|转化率}\n{b|' + (20 * 100.0) / 40 + '%}'
            },
            {
              x: '10%',
              y: topPercent + itemHeightPercent * (2 + 0.5) + '%'
            }
          ],
          [
            {
              x: '50%',
              y: topPercent + itemHeightPercent * (3 + 0.5) + '%',
              name: '{a|转化率}\n{b|' + (0 * 100.0) / 20 + '%}'
            },
            {
              x: '10%',
              y: topPercent + itemHeightPercent * (3 + 0.5) + '%'
            }
          ],
          [
            {
              x: '50%',
              y: topPercent + itemHeightPercent * 4 + '%',
              name: 'ReOrder'
            },
            {
              x: '90%',
              y: topPercent + itemHeightPercent * 4 + '%'
            }
          ]
        ]
      },
      itemStyle: {
        borderColor: '#fff',
        borderWidth: 1
      },
      emphasis: {
        label: {
          fontSize: 20
        }
      },
      data: data
    }
  ]
};
问题
- Q1:右侧最后一条是markLine,其动画和原series的labelLine的动画是否能统一;
- Q2:markLine没有看到设置层级的属性,如果markLine能设置在漏斗图的底部,那左侧线结束点设置为中心点的话(如上图)能方便些;
- Q3:这个方案画线是可行的,思路是先渲染漏斗图和右侧label,在labelLayout里获取实际item的rect的x、y位置,再根据前面获取到的位置数据计算绘制出左侧markLine。(但这个问题解决了,问题1还是得解决才比较完整)
尝试三
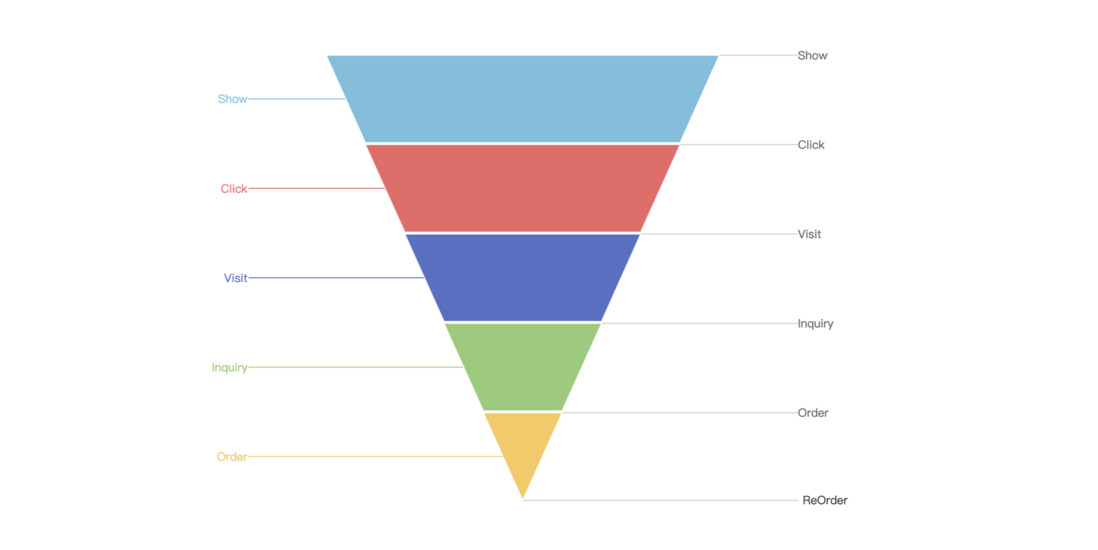
考虑用2个漏斗图实例(重叠),右侧rightTop,最下面那条线用markLine绘制
const data = [
  { value: 60, name: 'Visit' },
  { value: 40, name: 'Inquiry' },
  { value: 20, name: 'Order' },
  { value: 80, name: 'Click' },
  { value: 100, name: 'Show' }
];
option = {
  title: {
    text: 'Funnel'
  },
  tooltip: {
    trigger: 'item',
    formatter: '{a} <br/>{b} : {c}%'
  },
  toolbox: {
    feature: {
      dataView: { readOnly: false },
      restore: {},
      saveAsImage: {}
    }
  },
  legend: {
    data: ['Show', 'Click', 'Visit', 'Inquiry', 'Order']
  },
  series: [
    {
      name: 'Funnel',
      type: 'funnel',
      left: '25%',
      top: '10%',
      bottom: '10%',
      width: '50%',
      min: 0,
      max: 100,
      minSize: '0%',
      maxSize: '100%',
      sort: 'descending',
      gap: 2,
      label: {
        show: true,
        position: 'left'
      },
      labelLayout: function (params) {
        return {
          x: '15%'
        };
      },
      labelLine: {
        length: 10,
        lineStyle: {
          width: 1,
          type: 'solid'
        }
      },
      itemStyle: {
        borderColor: '#fff',
        borderWidth: 1
      },
      emphasis: {
        label: {
          fontSize: 20
        }
      },
      data: data,
      zlevel: 2
    },
    {
      name: 'Funnel',
      type: 'funnel',
      left: '25%',
      top: '10%',
      bottom: '10%',
      width: '50%',
      min: 0,
      max: 100,
      minSize: '0%',
      maxSize: '100%',
      sort: 'descending',
      gap: 2,
      label: {
        show: true,
        position: 'rightTop',
        animation: false,
        color: '#666'
      },
      labelLayout: function (params) {
        return {
          x: '85%'
        };
      },
      labelLine: {
        length: 10,
        lineStyle: {
          width: 1,
          type: 'solid',
          color: '#ccc'
        }
      },
      markLine: {
        symbol: 'none',
        lineStyle: {
          type: 'solid',
          color: '#ccc'
        },
        label: {
          color: '#333',
          animation: false
        },
        data: [
          [
            {
              x: '50%',
              y: '90%',
              name: 'ReOrder'
            },
            {
              x: '85%',
              y: '90%',
              name: 'ReOrder'
            }
          ]
        ]
      },
      itemStyle: {
        borderColor: '#fff',
        borderWidth: 1
      },
      emphasis: {
        show: false
      },
      data: data,
      zlevel: 1
    }
  ]
};
问题
- Q1:与上述”尝试二“一样的问题,markLine绘制的label和line的动画效果 和 hover效果需要调整和lableline的一样
尝试四
考虑用2个漏斗图示例(重叠),一个label的position为left,一个为rightTop。右侧有label的漏斗图多一层级,满足右侧line的功能,再隐藏多的那层级的item。
const data1 = [
  { value: 60, name: 'Visit' },
  { value: 40, name: 'Inquiry' },
  { value: 20, name: 'Order' },
  { value: 80, name: 'Click' },
  { value: 100, name: 'Show' }
];
const data2 = [
  { value: 60, name: 'Visit' },
  { value: 40, name: 'Inquiry' },
  { value: 20, name: 'Order' },
  {
    value: 0,
    name: 'ReOrder',
    itemStyle: {
      borderColor: '#fff',
      borderWidth: 1,
      opacity: 0
    },
    labelLine: {
      opacity: 1
    },
    label: {
      opacity: 1
    }
  },
  { value: 80, name: 'Click' },
  { value: 100, name: 'Show' }
];
const chart1_heightPercent = 80; //漏斗图2高度比例
const chart2_heightPercent =
  (chart1_heightPercent / data1.length) * data2.length; //漏斗图2高度比例

option = {
  tooltip: {
    trigger: 'item',
    formatter: '{a} <br/>{b} : {c}%'
  },
  series: [
    {
      name: 'Funnel',
      type: 'funnel',
      left: '20%',
      top: 60,
      bottom: 60,
      width: '60%',
      height: chart1_heightPercent + '%',
      min: 0,
      max: 100,
      minSize: '20%',
      maxSize: '100%',
      sort: 'descending',
      gap: 2,
      label: {
        show: true,
        position: 'left',
        formatter: '{b}\n{c}%'
      },
      labelLayout: function (params) {
        return {
          x: '10%'
        };
      },
      labelLine: {
        length: 60,
        lineStyle: {
          width: 1,
          type: 'solid'
        }
      },
      itemStyle: {
        borderColor: '#fff',
        borderWidth: 1,
        normal: {
          opacity: 0.8
        }
      },
      emphasis: {
        label: {
          fontSize: 20
        }
      },
      data: data1,
      zlevel: 2
    },
    {
      name: 'Funnel',
      type: 'funnel',
      left: '20%',
      top: 60,
      bottom: 60,
      width: '60%',
      height: chart2_heightPercent + '%',
      min: 0,
      max: 100,
      minSize: '20%',
      maxSize: '100%',
      sort: 'descending',
      gap: 2,
      label: {
        show: true,
        position: 'rightTop'
      },
      labelLine: {
        length: 80,
        lineStyle: {
          width: 1,
          type: 'solid'
        }
      },
      itemStyle: {
        borderColor: '#fff',
        borderWidth: 1,
        normal: {
          opacity: 0.5
        }
      },
      emphasis: {
        label: {
          fontSize: 20
        }
      },
      data: data2,
      zlevel: 1
    }
  ]
};
这个方案相对比较“完美”,核心是虚造多一个层级的数据,让n层级漏斗 和 n+1层级漏斗 完美重叠,从而满足item有labelline,item分界线也有lableline。
总结
echarts图表配置项比较多,大多都要一个个属性去配置测试。
官网漏斗图样例比较简单,且短时间内没有搜到和excel类似的例子,网上也不少人在提问。
本文是我跟着自己的思路去做的尝试,方案四也是基于前面的尝试后,考虑能不计算markLine位置、不考虑markLine/labelLine的动画一致这些问题,还是选择了“重叠”的方案,然后再想着怎么自然的多一条标志线,最后考虑调整(不同层级数的)两个漏斗图配置参数使其重叠。
这是我第一篇对外输出的在线开发笔记,很开心的。
解决方案一般都不止一种,文中我也有不少还没解决的问题和思路,也想请教各位同学亲们的,如果感兴趣,或者其他想法,欢迎大家留言一起分享或探讨的,谢谢!~


**粗体** _斜体_ [链接](http://example.com) `代码` - 列表 > 引用。你还可以使用@来通知其他用户。